| Download | Purchase | FAQ | Home |
Step #1 - Operation Step #2 - Images Step #3 - Web Page Step #4 - FTP Step #5 - Finish
Quick Start Guide Detailed Setup Thumbnail Properties WebPage Appearance FTP Settings Program Automation E-mail Settings HTTP Settings Misc Options GPS Setup HTML Properties Miscellaneous HTML
EXIF Editor Batch Processing Rotating Images
Preview Web Pages View Web Pages Sample Web Page Font Properties
RoboPhoto FAQ What's New in v3.0 Screen Shots Advanced Features HTML Template Files Sign Up With Tripod PAD File (htm) PAD File (xml) Legal Info End-User License
System Requirements Demo Limitations Download The Demo Purchase Unlocking The Demo |
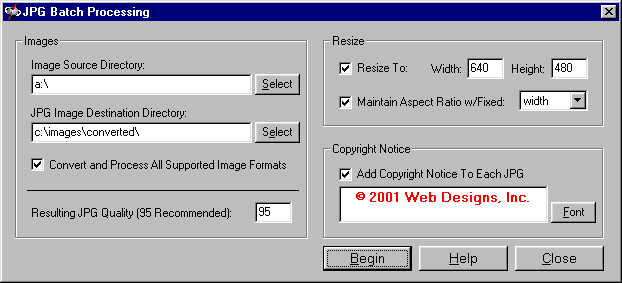
RoboPhoto includes an EXIF compatible JPG batch processor that allows you to convert, recompress, resize, and add copyright notices to a group on images. Typically, you would do this prior to creating a web page, using the output as the image source directory. To access the batch processing screen, either right click on any of the wizard screens or select the explicit option. Image Source Directory Click the 'Select' button to specify the image source directory. If the destination directory is the same as the source directory, the original images will be overwritten. Back to the top JPG Image Destination Directory Click the 'Select' button to specify the destination directory. This is where the processed images will be saved. If the directory does not exist, it'll be created. Make sure that you have sufficient disk space on the destination drive. You can specify the same directory for both the source and destination directories, but if you do you'll lose the original images. If you're using a floppy disk and have it specified as both the source and destination directories, it's possible that the converted files will be much larger than the original ones, causing you to run out of disk space. The converted files may be larger than the original ones if you use a high JPG quality value. Back to the top Convert and Process All Supported Image Formats By default, the program only processes the JPG files in the image source directory. If you check this box, the program will also process other image formats (PNG, uncompressed TIF, BMP, PCX, and TGA) by first converting them to JPG. Back to the top JPG Quality Specify the JPG quality. This is a number between 0 (lowest quality) and 100 (highest quality). If you're unsure what you should enter here, use 95. JPG files are smaller that normal image files because they're compressed - the higher the compression, the smaller the file size. However, there's a trade-off: as the compression increases, the image quality decreases. High JPG quality = low compression = big file size = nice looking images Low JPG quality = high compression = small file size = bad looking images The goal with specifying the JPG quality is to reach a compromise between small file size and acceptable image quality. If, for example, you specify a JPG quality of 0 you'll have very small files (good) but the image quality will be lacking (bad). A JPG quality of 100 will produce huge files (bad), but the image quality will be near perfect (good). Back to the top Resize Images Select this option to resize the images. The numbers that you specify are pixels. When you create a web page, your images should be sized so that they look acceptable in the user's web browser, i.e. they fit within the browser window without requiring any horizontal or vertical scrolling. It's common practice to assume that the user's screen is 800 x 600 pixels. If your images are larger than that, they won't fit and scrolling will be required. If in doubt, use images that are 640 x 480 when creating web pages. Normally, you should never increase the size of an image. As you increase the size of an image, the quality decreases and the disk size increases. You should normally maintain the image's aspect ratio (width divided by height). If you don't, you'll get distorted images that are not scaled the same as the originals. Note: If possible, you should rely on your digital camera or scanner to make images of the proper size instead of resizing them here. Every time you save a JPG file (such as after resizing), the image quality decreases. This is due to the fact that JPG files are compressed and with that comes a corresponding lose of image quality based on the amount of compression. The less times you save a JPG file, the better. Back to the top Add Copyright Notices Select this option to add a copyright notice (or any text) to the lower right corner of each image. Edit the text by typing in the box. Change the text properties (font, color, size, etc.) by clicking the 'Font' button. You should be careful about the font you choose. Some fonts do not survive the JPG compression process as well as others, i.e. they may look fuzzy or distorted after being saved with the file. Generally speaking, simple fonts (like Arial) are better choices that complicated ones (like Times New Roman). Some fonts (like Courier) look horrible when compressed with the JPG file. The font color also matters. Again, because of the JPG compression, darker colors will preserve better than lighter ones. Black is best. Back to the top Begin Click this button to begin processing. If your image source directory contains hundreds of files, the process can take several minutes. Otherwise, for only a few images, it'll take a few seconds. After processing, the program will report the number of files processed, number of files saved, and the number of unsupported file formats (such as GIF and compressed TIF) encountered. Note: If it's what you want to do, don't forget to specify the converted images as the image source directory when creating a web page. Back to the top Help Click this button to load the help file. You can also press the F1 key anywhere in the program for context sensitive help. Back to the top Close Click this button to close the form. Back to the top |